Tuesday, January 25, 2011

More plans


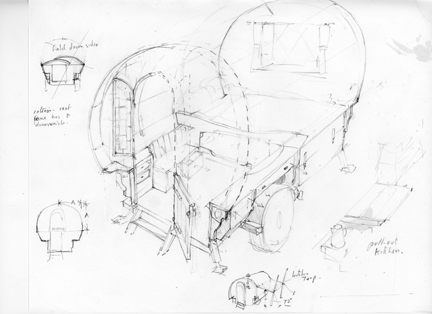
I started building the back wall and quickly decided that I need to figure out how the top was going to fold. This aspect of the design has considerable potential for problems. To this end I constructed a 1/10th scale model. With some jiggling and finagling I was able to come up with a plan that I'm pretty sure will work. My goal here is to keep the set-up and take-down as simple as possible. Ideally, the canvas cover will be fixed in place and will simply pop up as the front and back are pulled out. Once up, the cover will be supported by a snap-together frame. There are still some things that need to be resolved, but in my mind it works (ha!). A second advantage to making the scale model is that I could figure out where the smoke stack would go (roughly), and where the awning will be attached. This point of attachment needs to be 7 feet off the ground while still leaving enough room for the stack jack. The point of attachment is marked with a Sharpie line in the upper drawing. Looks like it will work out.

Sunday, January 16, 2011

The Box


With the exception of some caulking the box is finished. I've used 1/2" birch plywood and given the outside three coats of latex enamel. I had to do some complex routering to get the plywood panels to fit flush with the metal trailer sides....time consuming but well worth it for a tight, flush, fit that will be easy to keep watertight. The ledge supports are made of 1 1/2" thick vintage Douglas fir. Though covered in chicken crap when I bought it, it cleaned up nicely in the planer. The wood is free of heart center and has no splits. It was a shame to cover the wood with paint, but I want the side boxes to be of natural wood and want them to have something to be contrasted against.  We'll have to see if this gamble works.

Wednesday, January 5, 2011

More plans


I have been working on the plans some more. I'm departing from the more traditional vardo design. The door will be at the back, and some of the features (such as the external storage boxes) will have the look of a western camp wagon. Also, most of the wood will have a natural finish and the canvas top will also be natural. I own a Baker's lean-to, and I just love the feel and warmth of natural canvas and wood. I'm not as fond of ornate decoration (painting and carving), though I certainly appreciate and admire the workmanship of traditional vardo styles (see, for example, the amazing work of Jim Tolpin).

I'm thinking that the top will fold down (it will be canvas on a bent-wood frame). I had originally began with this idea a couple of years ago before considering hard tops. I am now settling this design as it will fix two big problems: 1) The wagon will be a lot safer to tow and 2), it will easily store in the garage. I'm not sure exactly how the mechanics will work yet, but I'll cross that bridge when I get to it. I just can't be too much of a pain to assemble.

Meanwhile, I have a pretty good idea now of how I want to set up the interior, and how the external storage boxes will work. Some of these boxes will house a fold-out kitchen. The kitchen area will have an awning that is attached to the trailer. There's a small sketch of this at the bottom of my drawing. Some of the Baker's lean-to design creeping in to this feature. The interior will be finished with reclaimed wood, including Douglas fir, mahogany, and quilted maple.

Decking

the basement
split-level deck


The deck is 1/2 inch OSB  supported by hemlock. The split-level allows me to extend the lower bunk over the frame (more on this later), giving my two daughters an extra 10 inches of leg room which they're going to need in a couple of years.

I will coat the underside with roofing cement before bolting it to the frame, and also run some tubing for the wiring . Should be good and watertight when I get done ( I got the idea of using roofing cement from this useful site).

Finishing the frame


Gave the frame a coat of machine enamel and attached the rear stabilizer jacks--I got these from Scamp Trailers